Crate a new action with the following code:
import javax.servlet.http.HttpSession
class LogoutController {
...
action {
HttpSession s = request.getSession()
s.invalidate()
redirect(controller:"itemPrice", action:"listDOA") // this is the new after
}
}
Monday, November 10, 2008
Wednesday, November 5, 2008
How to restore Grub from a live Ubuntu cd.
How to restore Grub from a live Ubuntu cd.
This will restore grub if you already had grub installed but lost it to a windows install or some other occurence that erased/changed your MBR so that grub no longer appears at start up or it returns an error.
(This how to is written for Ubuntu but should work on other systems. The only thing to take note of, when you see "sudo" that will mean to you that the following command should be entered at a root terminal.)
Boot into the live Ubuntu cd. This can be the live installer cd or the older live session Ubuntu cds.
When you get to the desktop open a terminal and enter. (I am going to give you the commands and then I will explain them later)
Code:
sudo grub
Code:
find /boot/grub/stage1
Next, THIS IS IMPORTANT, whatever was returned for the find command use it in the next line (you are still at grub>. when you enter the next 3 commands)
Code:
root (hd?,?)
Next enter the command to install grub to the mbr
Code:
setup (hd0)
Code:
quit
When you reboot, you will have the grub menu at startup.
Reference
http://ubuntuforums.org/showthread.php?t=224351
Tuesday, October 7, 2008
Friday, May 23, 2008
Using the Mic with Skype 2 on Ubuntu 8
1. Open volume control (dbl click on the icon or type gnome-volume-control in a terminal)
2. Go to 'Preferences' and enable the 'Capture' device.

3. Adjust the volume for the 'capture' device and make sure its not in mute.

4. That worked for me :)
2. Go to 'Preferences' and enable the 'Capture' device.

3. Adjust the volume for the 'capture' device and make sure its not in mute.

4. That worked for me :)
Tuesday, May 13, 2008
How to change resolution in Gnome without the panel icons jumping around
The gnome panel has this annoying habit of letting loose of your panel icons when you change the screen resolution. (This happens when I step down the screen resolution to suite the projector, for example).
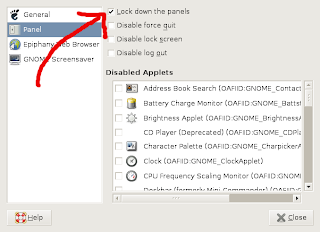
To prevent this, a nifty little application called 'pessulus' can be used to lock down the panels.
It can be installed in ubuntu as follows.
Lock down the panel as shown in the screenshot below.
No more messing up the panel icons when changing the screen resolution :)
To prevent this, a nifty little application called 'pessulus' can be used to lock down the panels.
It can be installed in ubuntu as follows.
$ sudo apt-get install 'pessulus'

$ pessulus
Lock down the panel as shown in the screenshot below.

No more messing up the panel icons when changing the screen resolution :)
Tuesday, May 6, 2008
Encrypted chats with Pidgin / Gaim
Doing encrypted (RSA) chats using pidgin is as simple as:
This installs the encryption plugin.
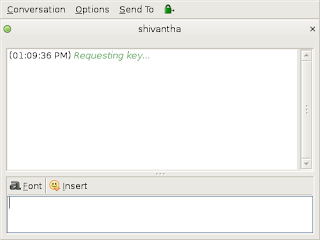
Encrypted chats are possible once you enable this plugin from preferences in pidgin.
Note the 'padlock sign' in the chat window below.
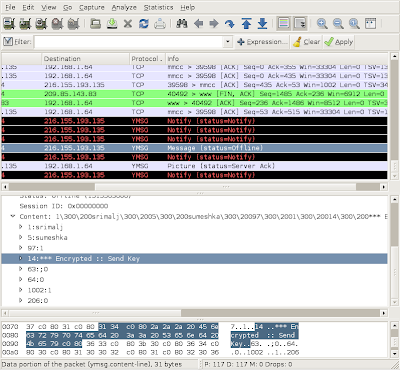
Check the packet data for yourself using a packet analyser like 'wireshark'.
+-+Wireshark.png)
Its encrypted !
:)
$ sudo apt-get install pidgin-encryption
This installs the encryption plugin.
Encrypted chats are possible once you enable this plugin from preferences in pidgin.
Note the 'padlock sign' in the chat window below.

Check the packet data for yourself using a packet analyser like 'wireshark'.
+-+Wireshark.png)
Its encrypted !
:)
Sunday, April 20, 2008
Installing Epson Perfection 660 USB Scanner in Ubuntu 7.10/8.04
Unfortunately Ubuntu did not autodetect my scanner but the installation was trivial.
- Obtained the driver file from http://www.epson.com.sg/epson/drivers/driver_download.htm?dc=1&mode=3&m=false&catid=5&pid=46
- Unzip the file. The file we need is TAIL_061.BIN (which is inside /DATA/BIN inside the zip file). Put this file in /usr/share/sane (or anywhere you please) and give read permission to all (chmod a+r /usr/share/sane/TAIL_061.BIN as root)
- Edit /etc/sane.d/snapscan.conf and change following line. (do as root)
 firmware /usr/share/sane/snapscan/your-firmwarefilefirmware

  to

firmware /usr/share/sane/TAIL_061.BIN.bin - Plug the USB cable
- Start xsane (type xsane in a terminal or find the program from the menu)
- Thats it!
Friday, April 4, 2008
Local DNS cache to speed up Ubuntu/Debian
This article explains how to setup dnsmasq to speed up dns requests.
http://ubuntu.wordpress.com/2006/08/02/local-dns-cache-for-faster-browsing/
http://ubuntu.wordpress.com/2006/08/02/local-dns-cache-for-faster-browsing/
Subscribe to:
Posts (Atom)